Sunday, July 1, 2012

SISTER STAMPS RELEASE #8 IS HERE!

Hooray!  Today is Sunday and a fun day as Sister Stamps Release #8 is available for purchase from today!  Congratulations Sister Stamps on your One Year Anniversary!  If you came here from Linda's blog, you are on the right track.  If not, go back and start at Sister Stamps.  Here is a pic of the new release:
Thank you for joining us on Day 4 of the Sister Stamps Birthday Blog Hop.  Today I want to share a card I made using all three new images:
I made a "Z-Fold" card and here is the front featuring "Miyoko."  Here's what the inside looks like:
Behind the first panel, I added a cupcake "just because" I didn't know what to place in that narrow panel:
Okay, so now the REAL FUN begins because you can all buy these new stamps!  Just click on the Sister Stamps icon on my right-hand sidebar.  And now, on to Jenny's blog! 
I hope you all had fun hopping along with us, and thank you for celebrating with us.  Have a gorgeous day!
Warm Aloha Hugs,

Saturday, June 30, 2012

SISTER STAMPS BIRTHDAY BLOG HOP - DAY 3

Happy Saturday, fellow crafters!  Hope you are all enjoying your weekend and enjoying lovely weather wherever you are!  Today is Day 3 of Sister Stamps Birthday Blog Hop, and if you came here from the sweet and talented Linda's blog, you are in the right place.  Today I'd like to introduce you to "Mariko," carrying a gift in her hand!  I think she is so adorable! Look at her:
Today's card is a 5.5" square.  I used a MS Deep Edge "Daisy Lace" punch and punched out the sides of the card front, leaving about a 1/4" border on the top and bottom to keep the card intact.  The center panel is a piece of wrapping paper I purchased from a local (Heiko) packaging supply store.  The pink flowers are all embossed and feels like "puffy paint" (I don't know how else to explain it LOL!).
I just love Mariko and Miyoko (introduced on Thursday), so I made another card with these two cuties:
So here's "Miyoko" on the front of a Circle Flip-It card (Sizzix die) and I placed her on a Sizzix "Flowers #3" die-cut that looks like a "sakura" flower.  Again I used some wrapping paper, this time in pink, and added a border using the MS  "Cherry Blossom Trim" punch. 
Here's "Mariko" on the inside of the flip card:
Thank you for stopping by today and please come back tomorrow for Day 4 of Sister Stamps Birthday Blog Hop.  
The next stop on your journey is to the sweet and talented Jenny's blog!
Warm Aloha Hugs,

Friday, June 29, 2012

SISTER STAMPS BIRTHDAY BLOG HOP - DAY TWO!

Happy Aloha Friday, fellow crafters!  Thank you for returning today to Day 2 of Sister Stamps Birthday Blog Hop! If you came here from the lovely and talented Linda's blog, then you are in the right place.  If not, go back and start at Sister Stamps so you don't miss any of the wonderful creations by the talented gals!
Today I'd like to introduce "Takeo" from the new set to be released on July 1st. Isn't he a cutie, running with some balloons tied to a bamboo stick! I decided to make a center step card and embossed the two side panels using a  bamboo embossing folder by Darice.
Here's the inside of the card:
I kept the inside simple without frills since "Takeo" may not want anything "girlie" so I stamped and cut out the balloons from the image and computer generated the sentiment to congratulate Sister Stamps.Very simple card.  Okay, your next stop is Jenny's blog!
Thank you for stopping by today, and I wish you all a fun-filled weekend!  Remember to come by again tomorrow!
Warm Aloha Hugs,

Thursday, June 28, 2012

Sister Stamps 1st Anniversary Birthday Blog Hop!

Hi fellow crafters!  Hope your week is going well.  Welcome to Sister Stamps Birthday Blog Hop as we celebrate their 1st Anniversary!  Isn't it amazing how time flies and before we knew it, Sister Stamps is One Year Old, and continues to offer the cutest Asian stamp images.  I am so grateful and honored to have been invited by Jenny to join her uber talented group of gals for this special occasion.  The Birthday Blog Hop will run for four days as we introduce the new images that will be available on July 1, 2012, and starts at Sister Stamps.  If you've come here from Linda's blog (Simple and Sassy Creations) you are in the right place.  If not, start back at Sister Stamps so you don't miss any of the beautiful creations. So, without further ado, today I'd like to share with you two cards I made featuring "Miyoko" and here she is:
This card is 6"x6" so I could fit the banner at the top.  I stamped Miyoko with Memento Tuxedo Black on cryogen white CS and colored her with Copics.  I added some white dots with a white Sharpie Poster Paint marker to pick up the dots on the DP (My Little Show Box-"Aiko-Blue Sky").  The banner was die-cut using a MFT "Banner Day" die, the white flower stems die-cut using a Memory Box "Fresh Daisies" die for Simon Say Stamp, and the border strip was punched using a MS "Cherry Blossom Trim" punch.
I wasn't happy with the following card easel card I made, but thought I'd share it anyway:
Thank you for taking the time to stop by today.  Remember, this Birthday Blog Hop runs for four days and prizes will be given to some lucky winners so please hop along with us!
Now head on over to Jenny's blog to see her gorgeous creation!
Warm Aloha Hugs,


Friday, June 1, 2012

Sweet November "Shroom" Gal - I Won It!


Hello fellow crafters!  Hope you all had a wonderful week and are ready for the weekend.  I am so embarassed about today's post because it is LOOOOOONNNNNGGGG overdue!  Back in February, I won this darlin' image called "Shroom" from Amy Young's (A Thousand Sheets of Paper) Sweet November Collection.  Amy also sent me the card she created and let me tell you, her coloring is so awesome!  I was over the moon excited to be able to actually hold it in my hands one of her many gorgeous creations! She is just the sweetest and most talented young lady out there.  Her creations are just so fun and her coloring and techniques are awesome.  I've learned alot through her video tutorials on "Color Me Copic."  So, on to my card that I created and completely forgot to post as I went through a "dry spell" and was MIA trying to find my mojo.  
I used a MS border punch to create the side borders on the card base.  All cardstock by Bazzill.  I found these two DPs with mushrooms on them and couldn't decide which to use so I used them both.  I stamped "Shroom" on cryogen white CS and colored her with Copics, cut her out, and added a small pink bling for her earring.  The sentiment is from Whimsy Stamps (Ticket Notes) and placed on the matching Fancy Ticket die.  It's hard to see, but I added some stickles on the dots on Shroom's "cap."  Small flowers from my stash
I kept the inside very simple and carried through the same layout as the front, only this time, I used the mushroom border as a pocket for my note to tuck inside:
A very clean an simple card.  I hope Amy likes this card.  I think I was more nervous coloring "Shroom" after seeing Amy's gorgeous coloring!  It's like I needed the "teacher's approval!."  LOL!  But she was fun and fast to color and I enjoyed  playing with her.  THANK YOU VERY MUCH, AMY!  Amy's Sweet November stamps are sold through All That Scraps so head on over and see the rest of Amy's  fun stamps!

Card Recipe:
Stamp:  Sweet November "Shroom,"; Whimsy (Ticket Notes)
CS:  Bazzill (white and pink)
DP:  Three Bugs In a Rug (Lazy Summer/Mushrooms), and Doodlebug (Over the Rainbow)
Ink:  Memento Tuxedo Black, Copics

Thank you all for taking the time to stop by today.  Enjoy your weekend, and happy crafting!

Warm Aloha Hugs,

Tuesday, April 24, 2012

Non-Easter Goodie Boxes

Hello fellow crafting friends!  Hope you all had a fun-filled weekend and ready to tackle a new week.  I can't believe it's been over a month since I last posted, but I've been in a crafting rut and had no mojo to create except to do "mindless" things like no coloring, and no time constraints with challenges LOL!  I did fiddle around doing other crafty things and this is one project that took up most of my time as I had to make several for some crafting friends.
Easter was fast approaching, and so I decided not to do a typical Easter basket for some goodies to give away as RAKs so I made some origami star boxes instead.  It looked quite bare as I didn't want to add any handles on the boxes, so I created a "lid" for the box and here is what I came up with:
I adhered some lace trim under the four "petals" of the box and tucked them underneath the box.  I die-cut a piece of chipboard and matching DP using my SB Labels One die (adhered them together), and then adhered it to the bottom of the box for stability.  I also made a mini double-pocket envelope card/note holder and again added some lace trim. 
Here's what the inside of the box looks like with the "lid" removed:
There are many instructions out there on how to make an origami star box; just Google it.  For my boxes, I used Bo Bunny Passion Fruit Flourish DP cut down to 9" x 9".  It's a double-sided paper and very pretty!
To make the "lid" I just measured the opening of the box and added a 1/2" seam all the way around.  In this case, the opening was 2.5" so I cut my CS 3.5" square, and scored 1/2" all the way around, made some snips to create a  shallow "box" then topped it with a die-cut chipboard/coaster using my SB Labels One die. I made a lace rosette to match the box and popped on a medium sized rose to use as the "knob" on the lid.
Thank you for stopping by today and I wish you all a wonderful week.
Warm Aloha Hugs,

Friday, March 30, 2012

ATS Wednesday Challenge - My First!

Happy Aloha Friday, fellow crafters!  I just got my new stamps from CC (Rubber) Designs and thought it would be fun to play in their Wednesday Sketch Challenge and then I would have to ink up my new stamps...I usually just store them for later LOL! I decided to use Bunny Lucy and here she is:
My card base is 5.5" x 5.5" from PTI white cardstock.  Then I used a mat piece cut from SU! Melon Mambo cs, followed by Jillibean's Egg Drop Soup DP. The side panel with the bunnies (which are hidden!) is from 3 Bugs In a Rug. I inked up Bunny Lucy with Memento tuxedo black and stamped on PTI white cs and colored her with Copics (R85, 83, 81, 00, and E35, 33, 31, 51).  I also added some Cotton Candy Stickles to part of her outfit.  The sentiment is from CC Designs (Amy R's Spring Logos).  The "I (heart) Eggs" sentiment is from Studio G.  I die-cut an egg shape from a SB Nested Eggs die, using Melon Mambo cs. This is the inside of the card:
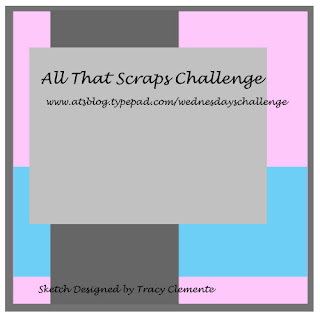
I thought the bunny design is so cute and just had to put a piece inside of the card since the one I cut for the panel on the front is obscured by the egg shaped mat piece and ribbon.  I used the same Jillibean DP on the jotting area with, again, a die-cut egg shape.  Below is the sketch from All That Scraps' challenge:
I'm also joining the following challenges:
Paper Play Challenge - Easter Theme
Cute Card Thursday - Happy Easter

Thank you for stopping by today and I wish you all a very fun-filled weekend.  Now I've got to clean up the mess I made to make this card LOL!
Warm Aloha Hugs,

Tuesday, March 13, 2012

ROSE SCENT TILDA For Just Magnolia Challenge #147

Hello fellow crafters!  Hope everything is going great with you.  The rains have finally stopped, and here in Hawaii we have the normal blue skies and sunshine.  My heart goes out to those that sustained damage to their homes and property from torrential rains and flooding, and those on the Mainland U.S. who also may have weathered tornadoes and loss of loved ones.  My heart and prayers go out to all of you.
I have a quick post today and won't keep you with my blabbering. I finally finished a card for the Just Magnolia & hAnglar and stAnglar challenge that is asking for something "Blue and White" and like my last post, I had to work with a limited amount of blue Copic markers.  Oh well. . .so without further ado, here is a simple card I came up with using Rose Scented Tilda from the "Sweet Crazy Love Collection" that you can get from Diana's Magnolia-licious online store (just click on the icon on my sidebar). I apologize for the glare.  No matter how many times I tried, because of the sheen on the cardstock, I wasn't able to avoid the glare.

Basically, my card is a 6"x6" base, followed by Bazzill bling CS (blue) and then a white mat, and another Bazzill bling piece that I embossed with a Lifestyle "Floral" embossing folder and I chose the one with roses.  It comes two in a pack.  I cut a white mat piece with SB Labels 15 and distressed with "blue silk" dye ink from Paris Trunk.  On top of that I die-cut another piece from Magnolia's "Somebunny Loves You - Turquoise Rose" DPs that I've had for a while.  The sentiment is from Stampin' Up. I added some pretty white lace trim on the bottom and added some blue rhinestone bling to each petal.  Both Tilda and the sentiment are popped up with foam tape for dimension.  That's it as the rest is just stuff from my stash.
I hope the Spring weather is brightening your day.  Stay healthy, be safe, and bask in the sun.  Thank you for your previous encouraging comments as they truly brightened my day, rain or shine!
Warm Aloha Hugs,

Tuesday, February 21, 2012

TILDA WITH PEONY TAILS!


Happy midweek fellow Maggie friends!  I have decided to play along in another Color Challenge at the Magnolia-licious Challenge Blog.  The lovely and talented Norma has chosen Blue & Brown for this challenge.  I very rarely, if ever, color with blues, so my Copic colors are limited, and I agree, I still need a lot of practicing to improve my Copic coloring skills LOL!  Anyway, here is what I came up with:
My card base is my usual 5.5" x 5.5" and I used SU! chocolate chip, followed by baja blue.  All of the DPs are from the Kaiser Craft 6"x6" "Le Chateau Collection" pad.  I really liked the print with this "Friendship" sentiment and decided to "offset" it so I wouldn't cover the pretty DP.  I die-cut the flourish from SU! kraft CS and used Cheery Lynn's Tropical Flourish die.  The little "Love" sentiment is also from this paper pack, and placed on a Memory Box "Ringed Buckle" die-cut, and I added a hemp bow with a little blue flower.  The huge flower at the top I made myself with Maya pleated brown ribbon and topped it with a blue rose from WOC. I wanted to mimic the ruffled peony flower.  Both Tilda and Love sentiment are mounted on foam tape for dimension.
This is what the inside of the card looks like.  I kept it flat and simple.  The sentiment you see at the top is from a talented and sweet friend from Idaho (you know who you are...and thank you very much!).  I die-cut it using my SB Labels 18 and distressed both layers with DIs.  The jotting panel again is very plain for easy mailing.  
Thank you for taking the time to stop by, and for all the encouraging comments I have received.  I appreciate them very much.
Enjoy the rest of the week, and have a wonderful weekend doing what you love.
Warm Aloha Hugs,

Saturday, February 11, 2012

Just Magnolia and H&S Challenge: Pink + Lace + Pearls

Hi fellow Magnolia fans!  Happy Saturday/Sunday to you all, and I hope you are enjoying your last weekend day before returning to work (if you do work!).  I told myself to settle down and make a card with a Tilda since it's been a while and I surprised myself by actually completing it!  I want to join the challenge at Just Magnolia and hAnglar & stAnglar and it calls for the color pink, pearls, and lace.  So this is what I came up with:
This is Tilda With Daisy from the Sweet Crazy Love collection...and I just love her!  I used a white lace trim on the bottom and topped it with some small pink fabric roses, and added some pearls to the flowers in the lace trim.  I cut Tilda out with a SB Labels Four die, and colored her with Copics.  I also added a pink vine from Memory Box called "Delicate Vine" and added some tiny pink pearls.  For the sentiment, I thought I would "dangle" the heart from the top of the card with pink pearls LOL!  And here's the inside of the card:
Very simple so it can lay flat when I mail it (postage has gone up again!).  I used the same lace trim and SB die for the jotting area, added a pink gingham bow and topped it with a fabric rose and that's it!
Thank you for taking the time to stop by, and I hope to get back into cardmaking very soon, especially with all the lovely new images from the Sweet Crazy Love collection! Have a wonderful day . . . every day!


Warm Aloha Hugs,

Sunday, January 29, 2012

A Mix of Some Fun Projects


Happy Sunday, fellow crafters!  Hope you are all enjoying your weekend and having fun.  I'm still not quite ready to do some stamping and coloring, but that's okay because I had a few projects I had to work on for several different occasions.  Here they are:
I needed some small gift bags to tuck some goodies in and came up with these.  The first isn't quite finished as I have to add a sentiment on it.  It was made using a Sizzix Scallop Circle Bag XL die.  My GF Linda taught me how to make some flower butterflies so I've been busy making butterflies!  I added some feathers to my butterflies and used one of them on the first goodie bag (thanks Linda!).  
I used the same Sizzix die for these and added butterflies again.  The pretty stems are from my sweet and lovely friend Suzan (my paper florist!).  
These goodie boxes were cut using a Sizzix "Box, Heart & Key" die.  The sentiment is adhered to a SB Fancy Tags die.  The flower was die-cut from a MFT Die-Namics Prima Donna Petals die that I just love because it naturally "cups" itself when you put them together.  Beneath the flower (that you can't really see) is another die-cut piece from Memory Box called "Ringed Buckle" and I thought it made a pretty "doily" for the flower to sit on.
Here's the whole lot of them that I gave to fellow crafters at a "Class" I attended on Saturday.  We had a lot of fun and made so many fun projects. Sorry this post was so long.  Thank you for taking the time to stop by.  I wish you all a wonderful (upcoming) week, and happy crafting!

Warm Aloha Hugs,

Wednesday, January 11, 2012

TILDA WITH COZY HEART


I can't believe I actually sat myself down and colored a few things with my new Sweet Crazy Love Collection stamps!  The inspiration came from the Magnolia-licious Challenge Blog for January, and the lovely and talented Cabio wants to see Pink, White, Red on our creations and my new Doodlebug "Sweet Cakes" 6x6 DP pad has just the colors!  So, this I what I came up with:
I don't know if it's my imagination, but the newer stamps seem to be a little bit smaller than before...but, hey, it's less for me to color!  You can get your Magnolia stamps and also some Memory Box dies (and other goodies) from Diana's Magnolia online store, simply by clicking on the icon on my sidebar and you can shop for oodles of goodies!  Deets on my card are below.  I used foam tape for the sentiment and Tilda.

CS: PTI Select White for card base; red linen; Bazzill Diamond
DP: Doodlebug "Sweet Cakes" 6x6 pad
Stamps: Magnolia Sweet Crazy Love Collection:  "I Love You" and "Tilda With Cozy Heart"
Ink:  Memento tuxedo black and angel pink (distressing); Copic markers
Others: MS PATP "Sweet Heart," Nellie Snellen heart die; Memory Box "Ringed Buckle" die, WOC rose
Thank you for stopping by today.  I wish you all a wonderful week, and until the next time, happy crafting!

Warm Aloha Hugs,

Monday, January 9, 2012

HAPPY NEW YEAR!


Happy New Year Everyone!  Hope you all enjoyed the holiday festivities with family and friends, and had lots of yummy things to eat!  I can't believe my last post was in November!  Well, lots of family things have been happening, some good, some not too good, and I truly lost my interest for crafting.  I can't even color with Copics anymore!  I have been busy creating other things, but just not coloring in an image.  So today, I have a few things I'd like to share with you.
I totally am in love with the Tim Holtz "Vintage Cabinet Card" die and have been playing with it since November.  The finished size is about and A2 card, just a little smaller, so it's easy to mail.  I've used Basic Grey 6"x6" Capella paper pad for all of the cards below.  Here are a few of the cards I made as thank you cards and for the new year since I didn't make a single Christmas card.  I finished around 12 of these cards as they were so fast and easy.
The inside is basically the same layout, just different DPs that coordinated from the pack.
I made a few with this sentiment on the front and inside.
Thank you for stopping by today, and now that I have some new Magnolia stamps, I'll be playing with them soon for Valentine's Day.  Have a wonderful day, and happy crafting!
Warm Aloha Hugs,