Thursday, December 23, 2010

Christmas Cards and Gift Card Stockings

Quick post as Christmas is only two days away and everyone is very busy with last-minute details before the big day.  I have two identical cards I made with hAnglar and stAnglar images, and a few gift card stockings:
Here are some stockings I made that holds a gift card (or a check folded and tucked inside.  I was inspired by my friend Janie and this was quick to make up.  You can get this freebie template from Claire Brennan's site, Waltzing Mouse.   Sorry I didn't show a pic of it open as I already wrote a message inside under the cuff.

Thank you for stopping by today, and I wish you all a very MERRY CHRISTMAS!

Wednesday, December 15, 2010

LAZY SUMMER DAY TILDA NOTE HOLDER WITH PEN

How are all you crafters doing with the last-minute Christmas rush?  I needed to take a break before finishing up a few more cards and thought I'd work on something other than Christmas!  About a month and a half ago, my GF Joy sent me a whole pack of these cute glittered polka dot CS and I've been wanting to do something with them so here is what I made:

I've had these mini pens for a while and decided to make a note book cover for the 3" x 3" Post-It pads.  You've seen many versions of these and I made mine to fit the height of the pen that is about 3.25" high.  It's hard to see the polka dot CS on the cover because I practically covered it up with some lace trim on the bottom, ribbon, a sentiment stamped on a Labels Eight die cut, stamped a sentment from SU!, and added a pink rose on a MS Vintage Doile punched out of pink vellum.  Then of course there is the sweet and adorable Lazy Summer Day Tilda colored with Copics.  I added some polka dots to her outfit.  On the inside cover, I die-cut a piece of the DP with the Labels Eight die and attached a 2011 calendar.  Then I thought I should put them in a box or bag and add some treats (Toffee Macadamia Shortbread cookies): 

The BEST part is, back in mid-November, I won a template from Adela Rossol of Creations by AR.  She has so many wonderful templates and I had a hard time selecting one and chose this, and of course purchased a couple more.  This template is called "3-Pocket Caddy" and was fun and fast to make!  Thank you so very much Adela.  She is one of the hosts on PaperCraft Planet's 3-D Tuesday challenges.  There's so much to learn from PCP and all the talented gals there. 
Finally, here is what it looks like in the caddy, sans ribbon, I plan to tie on the handles.  Below is also an inside view of the caddy.  The note pad fit perfectly! 

Thank you for taking the time to stop by today and I hope you visit Adela's web store if you haven't already.  Have a wonderful week and have fun (?) shopping and/or crafting.


Sunday, December 12, 2010

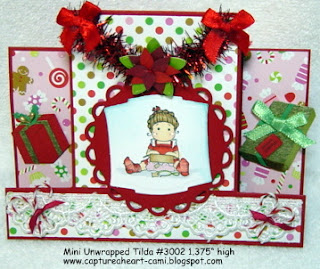
MINI UNWRAPPED TILDA ON A CENTER STEP CARD

I just can't get enough of these mini Maggies!  Today I was able to play again and used Mini Unwrapped Tilda who is only 1.375" high!  How tiny and fun!  I'm using all my smaller SB dies.  A while ago, I came across a "center step card" on Sandy's blog, Creative Moments with Sandy.  She has instructions on making a 4.25" x 5.5" center step card and it's perfect for mailing in a regular A2 envelope.  Briefly, I used a red linen CS for the base, Doodlebug DPs, some red tinsel garland from MME "Lost and Found," stickers (presents and poinsettia) from Jolee's, miniature candy canes from my stash that I criss-crossed and glued together.  I die-cut Tilda's image from SB Labels Two, and mounted that on the the 4th Lacy Circle die (or 2nd smallest).  That's it!  And here is this sweet mini Tilda:

Remember, you can buy these wonderfully cute Mini Maggies from Diana's online store.  Click on the Magnolia-licious store logo on my side bar.  Thank you for stopping by today, and now I have to run as I'm frantically trying to finish some Christmas cards and little goodie bags for some friends.  Have a wonderful week shopping, wrapping, or crafting! 

Warm winter hugs,

Friday, December 10, 2010

MINI MAGGIES ARE IN MY HOME NOW!!! I JUST LOVE THEM!!!

I can't believe that Christmas is only 15 days away! This whole year is just whizzing by, and too fast for me.  Yesterday was one of the best days I've had in a while and that's because I finally received some NEW MINI MAGGIES from Diana's Magnolia-licious store.  You can hop on to her store by clicking on the store logo on my sidebar.  These images are sooooo teeny-tiny and sooooo adorable!  Perfect for tags and note cards.  My monitor is on the blink so I could not edit my pics to get it clear and it's like I'm "working in the dark" trying to get the best effect so please excuse the poor quality of my pics.  So this is what I made with them:
This first one is Mini Christmas Party Tilda (#3022) and she is only 1" wide by 2" high! Can you imagine that!??? I've put her on a discontinued SU! note card that measures 2.5" x 3" so this is very tiny . . . but super fast to color! I love that!  I made this for the Magnolia-licious Challenge Blog, a color challenge this week, using pink, blue, and green.  
The pic below is a side view of the little note card 
The second is Mini Secret Tilda and she is 1" wide by about 1-5/8" high!  She's just a cutie-patootie!  The tag base is 3" wide by 5" high but she still makes an impact because of her cuteness.  I've kept embellies to a minimum so these mini Maggies aren't lost.  I have more to play with tonight and guess what?  Yep.  I ordered more minis from Diana and can't wait to get them so I can start making things for next year!  Don't wait!  They are flying out the door really fast and remember, Diana is the sole distributor for these Mini Maggies!!! 
I made sure to have a cup of coffee so I can stay up late tonight playing with my new, most wonderful, mini Maggies!  I think, right now, they excite me more than the regular sized ones because I can put them on small treat boxes and gift tags/notes for the holiday season!  So many ideas running through my mind but I just hope to finish them LOL!  Happy Friday/Saturday to all you wonderfully talented crafters out there!  Have a great weekend...I know I will!  Thank you for taking the time to stop by today, and go shopping at Diana's store!

Warm Hugs,


Tuesday, November 23, 2010

JUST MAGNOLIA CHALLENGE WEEK #83 - WHITE + ONE COLOR

This is my second post for today so please scroll down to see some tags I made with the Lazy Summer Day Tilda!  This is not normal for me, but I decided to play in the Just Magnolia challenge this week and it's due by Thanksgiving Day!  I chose to use the color red with white.  A very simple and quick card today, and here it is:

My card base is my usual 5.5" square from red linen CS.  I cut a smaller piece of flocked white snowflakes on vellum that I purchased last year!  I cut a strip from this vellum and die-cut a paper rosette from the Sizzix/Tim Holtz die, topped it with a silk poinsettia and flowers (from my GF Suzan!).  I used the largest and 2nd largest of the SB Lacy Circles die.  My favorite part was stamping and coloring this cutie "Tilda With Hanging Heart" image!  I added Prisma Glitter to her wings, and adhered her with foam tape.  Oh my, so many wonderful stamps from the 2010 Merry Little Christmas Collection.  I also stamped and cut out the "Noel" from the 2009 "So Jolly & Under the Mistletoe" collection.  You can get all your Magnolia stamps from Diana's online store by clicking on her store icon on my sidebar!  That's it! Quick and simple!
Recipe
Copics:  (Dress, Noel, and ornament) R59, 29, 27, 24, YG67, 17, 03; (Hair) E25, 31, Y21

Thank you for stopping by today.  HAPPY THANKSGIVING!!!

3-TAG SWAP - LAZY SUMMER DAY TILDA

Happy Tuesday/Wednesday to all you wonderful crafters!  Today I'd like to share some tags that I made and received from my swap partner for Kyoko's 3-Tag Swap.  Since the holiday season is frantic, Kyoko combined the November/December swaps and we were asked to make 6 same tags for our partner.  First I'd like to share the wonderfully cute tags I received from my partner Brenda of Sweet As A Gumdrop!!!  She's is known as Hawaii's "punch queen" and you will see why!  My pic doesn't do her tags justice to please go check them out on her blog here. 

Everything is punched out! I don't know how Brenda does it, but she always comes up with something new.  I've never seen the same punch art twice. 
She also made a box to hold all the tags!
Brenda also included this cute stamp from In Style Stamps, and a package of pretty crocheted flowers from Stampin' Up.  I can't wait to ink up this cutie!
Thank you so much, Brenda.


These are the 6 tags I made for Brenda.  I started out using "Lazy Summer Day Tilda" then I thought to myself, Brenda has little ones and I should be making tags for the kiddies so I pulled out my EK Success gingerbread boy punch and placed it on a Sizzix Luggage Tag 2 die-cut.  You can lift up the gingerbread boy and add the "To and From" on the inside of the tag.  I apologize for the glare.  I die-cut the sentiment tag from a Sizzix "Tags, Christmas" die that my GF Suzan sent to me, from some QuicKutz adhesive foil paper. 

Thank you for stopping by today and I wish you all a very HAPPY THANKSGIVING!  Have fun fighting the crowd on Black Friday!!!


Sunday, November 21, 2010

MAGNOLIA-LICIOUS CHALLENGE BLOG! - PINK AND YELLOW

ETA:  I have added deets on this card below after receiving some requests.
Oh I am so late!!! I wasn't going to play in the very first Challenge over at Magnolia-licious, but decided to challenge myself with this color combo!  There are so many beauitful creations so go check them out here!  Here's what I came up with this afternoon:

I'm so sorry I don't have time to go into details for fear I will miss the deadline if I haven't already!  Thanks for stopping by today!  Lots of crafting hugs to you all!
Recipe:
Stamps:  Kitchen Tilda (with cooking spoon) and Kitchen Rolling Pin from the 2009 A Little Yummy For Your Tummy Collection; Longing Tilda from the 2010 Fairy Tale Collection, and Sugar Bag from the 2010 Raising The Ceiling/Right Through Your Heart Collection
DP:  Nana's Kitchen
CS:  SU!  Pink Pirouette, So Saffron
Copics: 
(Dress): R83, 81, RV10, Y18, 15, 13
(Sugar Bag, Shoes, Rolling Pin):  E42, 41, 40
(Hair):  E25, 31, Y21

Saturday, November 20, 2010

hAnglar and stAnglar Christmas Cards

Thank you for taking the time to visit with me today.  I finally had a chance to work on some Christmas cards and started with my new hAnglar stamps!  They are so cute and I love them just as much as my Magnolias!  Here's the first two identical cards I made:

The embellies on my card are from my dear friend Suzan!  Thank you Suzan!I'd better get going as I have many more to make and time is running out.
Thank you for stopping by today, and I hope you are all enjoying your weekend.  Happy crafting!

Friday, November 12, 2010

OCTOBER 3-TAG SWAP (LATE!)

I am so late in posting my October 3-Tag Swap!  But, better late than never!  Kyoko hosts a monthly 3-Tag Swap that has been a lot of fun and enjoyed by all participants.  We'll see if she will continue again next year.  Here's what my partner, Jodi, sent to me:
Aren't they just adorable?  I'd better keep one for myself! Jodi also sent me a cute Halloween card with one of my favorite Magnolia images, Tilda, and a Belle's 'n Whistles stamp, Tania Baking!
No, you aren't required to send any RAKs, just the tags, but this is how Jodi is...always so thoughtful and generous.  Thank you so much Jodi and I just LOVE all the tags you made for me! 
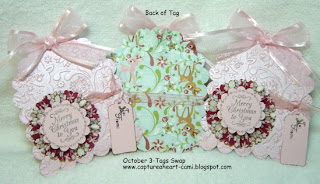
And here are the 3 tags I sent to Jodi.  I used a new Sizzix embossing folder that comes with two EFs, and I used "Dearly" and it was made to match last year's (go figure!) Basic Grey DP which I used on the back side of the tag and you can see the little deer (if you look good, LOL!). Luckily I had one sheet left!  Jodi's favorite color is pink, so I used pink Bazzill "October" bling CS. 
 Here's a close-up of the tag so you can see the embossing.  I also made a rosette with Sizzix/Tim Holtz Paper Rosette die out of Dream Street Papers' Wonderland-Magical Moments DP.
Thank you for stopping by today.  Have a fun-filled weekend.  I'll be very busy finishing up some cards for posting tomorrow, and also some little RAKs I'm making for a get-together over the weekend.  

Tuesday, November 9, 2010

Magnolias: Something Old, Something New

Happy Tuesday fellow crafters!  What's "Old and New?"  Today I thought I'd use something old(er) along with a new(er) image from Magnolia.  I don't get to ink up my stamps as often and with such a huge, wonderful selection and me wanting to get every one, I'm continuously buying (almost) every stamp that comes out,  and I found that most stamps get inked no more than twice!  Enough rambling, so today I used "Tilda With Heart Ornament" from the 2008 Christmas Collection, and the Candy Cane that came in my 2010 Fall kit.  I'm playing along in the Magnolia Down Under Challenge #71 which asks that you "make your own embellishments." 
My card base is 5.5" square from black linen CS, then layered with Imaginisce Polar Expressions DP.  I don't remember the other DP I used as I got it out of my scrap box.  The embellishments I made are the rosette from stretchy red gingham ribbon, and the chain with three bells dangling from the rosette. I colored each image twice, cut out some areas from the second, then layered on the first for some dimension.  I've also added some Prisma Glitter to the white areas of the candy cane, Viva Glass Effect Gel to the red areas.  I used Butter Cup Stickles on her heart ornament.  I added a black flourish behind Tilda with the Tim Holtz Alterations Elegant Flourishes die since the space behind her looked too bare.  If you would like to know the Copic colors I used, it's listed below.
Copics:
Dress, stockings, and candy cane:  R59, 29, 27, 24, 01; YG67, 17, 03
Ornament:  Y18, 15, 11
Hair:  E25, 31, 15, Y21
Skin:  E50, 00, R00 (cheeks)
Thank you for stopping by today.  Christmas is not too far away and I've got to start making my cards and I'm sure you all are doing the same LOL!  Have a wonderful week, happy crafting, keep warm and stay safe.


Wednesday, November 3, 2010

Happy Holidays from Tilda!

Hello my crafty friends! Thank you for spending some time with me today. I just received my Bo Bunny Winter Joy DPs and I love the colors and design! Non-traditional colors, but so fun to work with.  I wanted to keep my card simple so most of the design and colors wouldn't be covered up!
I decided to dust off some older Magnolia stamps since I really ink them only twice or so and that's such a waste to me!  So here I've inked up Tilda With Yule Hat from the 2008 Christmas collection.  My card base is a whopping 6" square because I wanted to use a page from Bo Bunny's "Noteworthy" journal pages and I didn't want to cut it down or take away from the shape.  Tilda is colored with Copics and I added some Fun Flock to her cap and stockings to give it a nice warm and fuzzy look. I also added some Prisma Glitter to her inner dress for some sparkle, and also Stardust Stickles to the punched out Christmas trees.  That's it! Simple!
Recipe
Stamp:  Magnolia - Tilda with Yule Hat
CS:  Bazzill (white)
DP:  Bo Bunny Winter Joy
Punch:  EK Success
Copics used:
Dress:  V15, V17, BG000, BG01
Hat:  YG25, YG03, YG000
Hair:  E15, E13
Stockings and Hat: V000l V01 (then flocked)
The rest are from my stash.
Something new to me:  The white dots on Tilda's cheeks were made with a Sharpie Ultra Fine white water-based pen that I received from Tammi! I love this pen! So smooth and makes perfect small dots...better than gel pens!  Thank you Tammi!

Sunday, October 31, 2010

RAKs and a Rosette Sample for Debbie

HAPPY HALLOWEEN EVERYONE!  I almost forgot to post a couple of cards I received for Fall and Halloween.  I can't believe we're heading in to November already!
This first card is from Tammi! My pic of her card doesn't do it justice!  I'm not a good photographer at all!  You can see more of  her beautiful creations here.  You'll love all of them!  Thank you very much, Tammi!  


This next card is from Suzan!  Isn't this witch the cutest?  You can see more of Suzan's beautiful creations here.Thank you so much, Suzan!


You can stop here as the following is just a sample of a layered rosette using Tim Holtz's Paper Rosette die.  I ran into Debbie at one of our LSS and we were talking about this die and how much we love it.  I just wanted to show her how I layer the pieces or "nest" the pieces.

I die-cut 3 pieces according to how many of each color paper I want my rosette to be.  The base layer, I leave as is, the second layer (from the outside in) I cut down to 1" (lay the scallops on the 1" line of your paper cutter), and the third piece is cut down to 3/4".  Before I start working on my rosette, I punch a 1" circle from cardstock and place a 3-D Glue Dot in the center and leave this on the side.  I accordian fold each piece and adhere the ends together.  I randomly add a touch of glue around the base rosette and "nest" the next layer in the pleats, keeping the inside ends even.  I again add a touch of glue around the second layer but in different areas so the glue doesn't "bunch up" in the same spot.  Nest your next layer, keeping the ends even.  Flatten out your rosette, turn it over, and while holding it down on your work surface with one hand, take the 1" circle with the glue dot and place it over the center.  Flip your rosette over to the right side and your rosette will now stay in place and you can adorn it whichever way you want to.  Here's a sample of a two- and three-layered rosette.  Nothing fancy, just a sample.
 
Well, that's it and October is already behind us!  I wish you all a wonderful new week and welcome November with more fun and crafting!  Thank you for stopping by, and until next time, stay safe.

Saturday, October 30, 2010

Just Magnolia Week 79 Sketch

Happy Saturday, going on Sunday!  I decided to take a break from cleaning out my craft room and came across this sketch challenge over at Just Magnolia.  This sketch is by the lovely and talented Dawny P.  It's funny how when you don't play with Copics for a while, you feel you have to learn all over again (for me that is!).  So I decided to start out with a simple card to get back in the groove. 
My card base is the usual 5.5" square and I just got my new SU! "Cherry Cobbler" textured CS and I just love this color! It is now my fave of the reds.  I apologize for the lousy pic. It was so hard to get the right colors because of the glitter on her wings and socks. The DPs are from Cosmo Cricket "Mitten Weather" mini deck that I got from Tammi! (Thank you Tammi!). I didn't cut the layers correctly so I had to end up using something "smaller" to fit!  Hence, I used the Holly Envelope (#422 from Diana's store - click on my sidebar) and this cute mini Tilda from the Magnolia Fall kit. I'm not sure of her name but it may be Starlight Tilda. She is so cute and tiny!  The circle is from SB Big Scalloped Circles LG that I embossed with a Sizzix "Frost" embossing folder. It's hard to tell from the pic but I used some taupe colored ribbon from SU! and placed a strip of red ribbon on it.  The red rose is from my GF Suzan.  (Thank you Suzan!). The ticket sentiment is from Whimsy Stamps by Raindrop Echo Designs.  Here's the lovely sketch by Dawny P.
I apologize . . . for some reason Blogger won't let me insert the sketch. You can see it on the Just Magnolia site. Well, tomorrow is the last day of October and HALLOWEEN!!!  I wish you all a fun and safe "trick or treating" tomorrow evening.  Thanks for stopping by.
P.S.  Tomorrow I will be sharing a paper rosette using Tim Holtz's rosette die for a non-blogging friend, Debbie, whom I met at one of our local scrapbook store.

Tuesday, October 19, 2010

HALLOWEEN BRIGITTA

Happy Tuesday fellow crafters!  I have my very first Halloween card for this year to share with you.  Actually, I kinda jumped the gun on this one as it was supposed to be for one of Tamiko's Thursday Teasers, but our assignment was changed and I almost forgot about this card.  At least I can say I made "one" Halloween card:
I used a CC Rubber Stamp Swiss Pixies "Halloween Brigitta."  Isn't she adorable???  I love her with her spider costume.  My card base is a 5.5" square from black linen CS, followed by some orange Bazzill dotted CS.  The DP is from Debbie Mumm's Harvest & Holiday collection that I received from my dear and lovely friend Suzan (thanks Suzan!).  It's so pretty and sparkly with all the glitter so it was rather hard to take a good photo and I apologize for the glare.  The ghost border punch at the top is a MS PAP from my sweet and talented friend Jodi (thanks Jodi!).  I colored her with Copics, then added Prisma Glitter to her hair, wings and boots.  I also colored another hat, cut it out and adhered with pop dots for dimension.  You can barely see it, but I tied a piece of black floss around the tip of her hat and attached a spider that I cut out from another piece of DP, and adhered it to the flower.  The pumpkin button is attached with black floss to the bow.  (Thanks for the button Suzan!)
Thank you for stopping by today.  I hope your week has gotten off to a great start!  I'm still cleaning and reorganizing my messy craft room and apologize for not visiting as many sites as I would like to.  But I'll be there visiting soon again! 


Thursday, October 14, 2010

TAMIKO'S THURSDAY TEASER - ALTERED CC RUBBER STAMPS

Happy Thursday, fellow crafters!  For today's Tamiko's Thursday Teaser, the CT's assignment was to use both a sketch, and we were given a chance to alter a CC Design image this ONE TIME only.  We were allowed to swap a head with a different body, but no "wiping away" anything.  I would like your feedback after you have seen what I came up with so we can let CC Designs know your thoughts.  So on to my card:
Can you guess what I did?  I took the head from "Fairy Tales Belle" and put her on "Cupcake Kiki's" body.
My card base is 5.5" square using Bazzill white CS, layered with CTMH Sweet Leaf (very old CS), then Bazzill dotted CS.  I die cut three different sizes using my SB Big Scalloped Circles LG from some DP I had in my stash.  I couldn't find the right size acrylic hearts so I just used some pink heart confetti I had on hand to put on the cupcake and on the butterflies.
The bottom border is die-cut from my Marianne design Creatables ribbon die.
Here is the sketch we were provided for this assignment:
Thank you to Taylored Expressions for this wonderful, fun sketch.
So, what do you think of this altered CC Design image I created? 
I have one more thing to share with you.  As we approach the hectic holiday season, I will be on "sabbatical" through the end of the year as far as Tamiko's CT is concerned.  I will continue to post my other projects that I have put on the side.  Truly, so many images to play with and not enough time to finish it all.  Thank you for stopping by today, and since the weekend is right around the corner, I wish you all a fun-filled weekend, and some happy crafting!

Thursday, October 7, 2010

TAMIKO'S THURSDAY TEASER - October is Breast Cancer Awareness Month!


Happy Thursday fellow crafters!  It's time again for Tamiko's Thursday Teaser.  Our assignment this week is the color pink to acknowledge that October is Breast Cancer Awareness month*. Lets band together and support our fellow Sisters around the world, and remember to get yourself checked.  So here's my card:

My card base is 5.5" square cut from SU! pink pirouette CS, then layered with a smaller DP from MME-Lost and Found/Market Street "Lovely" Shabby Chic.  This paper is so pretty with lots of nice deep pink glitter scattered around.  I used my SB heart Nesties to die-cut the two hearts, from Bazzill CS.  I love butterflies and chose to ink up Flutter Anya  from The Greeting Farm, and paper-pieced the bottom of her dress.  (Note: I didn't want to play hit or miss and ruin this beautiful DP so I stamped her dress part on plain CS, cut out the portion I wanted, placed it over the area I wanted on the DP, used a black Multiliner pen and drew around the shape so it looks like it was stamped and it saved me so much of the pretty paper.  I just can't seem to ink up only the portion I want to paper-piece and stamp it perfectly on the DP so this is my "cheat" way!)  She is colored with Copics and I added Prisma Glitter to her wings.  She is popped up with foam tape for dimension.  I needed to balance my focal point so I used two Hope ribbons with a tiny pink paper flower attached to each ribbon, and a bow and flower (colored with Copics) added to her hair.  I also added a small piece of pink crochet lace trim between the two hearts and tried not to cover up the pretty DP.  You can get this sweet Flutter Anya from Tamiko's online store here, or by clicking on her store icon on my sidebar. *For the month of October, Tamiko is offering an additional 10% off of your purchase in recognition of Breast Awareness Month.  At checkout, in the comment box, type in PINK10.  That's all you have to do!  Please visit my sisters on Tamiko's CT to see their lovely creations.  Thank you for stopping by today.  The winter weather is fast approaching and so many friends have been catching a cold so please keep warm and stay healthy.   


Thursday, September 30, 2010

TAMIKO'S THURSDAY TEASER: EMBELLISHMENTS

Happy Thursday fellow crafters!  It's time again for Tamiko's Thursday Teaser, and this week, our assignment is embellishments:  brads, buttons, bling!  Here's my card:

My card base is 5.5" square cut from SU! pink pirouette, followed by soft suede.  DPs are from Memory Box stack.  Here I've stamped "Maria" from the "Roll Call" set that I bought from Tamiko's online store.  There are so many images in this set that I love.  Maria is colored with Copics, cut out, and adhered with foam tape on two SB big scalloped circles (large) die-cuts. I adhered tiny flower buttons to the flower in her hair, a star button on the bow, and a pearl brad to the bling flourish on the side.  You can see what the other CT members came up with by going here.
Thank you for stopping by today!  Tomorrow is Friday already, and can you believe OCTOBER??? I'm sure you're all ready for the weekend!  I know I am!  The CT is getting together just to "hang out" and talk about our upcoming assignments and challenges so that will be fun and it's always nice to get the gals together for fun and eating!  Enjoy your weekend.

Thursday, September 23, 2010

TAMIKO'S THURSDAY TEASER: USE A SPELLBINDER DIE!

Happy Thursday fellow crafters!  You know what today is! It's time again for another Tamiko's Thursday Teaser, and this time, we were asked to use a Spellbinder die on our card. 
When I looked through my SB dies, I found this Label 7 die and thought it looked like an "open book" so I thought some sentiments would be appropriate on the "page" and made an easel card. Here I've used this cute image from CC Rubber Stamps called Fairy Tales Belle and you can get her at Tamiko's.  I paper-pieced her jumper and her boots...since my coloring sucks right now LOL!  The rest of her is colored with Copics but I just couldn't decide on her outfit haha.  Then I adhered her with foam tape.  I curved the "pages" and propped it up a bit for some dimension. The ribbon in the center is supposed to be a "bookmark" on this open page.
Please go check out what the other CT members came up with here.  You will be delighted. 
I would like to mention that Tamiko's is happy to do special orders so if you don't see something you want at Tamiko's online store,  send her an email to let her know what you are looking for, and she will assist you.  Payment will be handled through PayPal as usual.  Thank you for stopping by today, and remember you have until September 30, 2010 to enter your project in Tamiko's Altered Greeting Farm Challenge going on right now.     

Saturday, September 18, 2010

AUTUMN TILDA

It's Sunday already and I hope you all are enjoying your weekend.  I came across a challenge at 7 Kids College Fund and your project must be fall themed, using a sketch designed by the sweet, lovely and talented Suzanne Dean, and must include an image carried by 7 Kids College Fund.  This is what I came up with:
My card base is 5.5" square and I used SU! crushed curry for the base, followed by SU! chocolate chip. The DP is from Debbie Mumm's Harvest & Holiday stack that I got from my lovely GF Suzan (thank you Suzan!).  For the right side panel, I used my SB "On The Vine" 12" border die cut from Bazzill CS. I stamped "Sitting Fall Tilda" with Memento tuxedo black on PTI select white CS, colored her with Copics, cut her out, and adhered her with foam tape. She is sitting on a bed of fall leaves.  Sentiment is also from Magnolia and flowers from both Wild Orchid Craft and Suzan!  Here's the sketch designed by Suzanne Dean:            
Thank you for taking the time to stop by today and I hope you have a wonderful week with some crafting time squeezed in.