I finally had some time to make a card and I just had to play with this darlin' little "Mini Tilda" and I would love to see more "mini stamps" in the future! You can get your Magnolia stamps from Diana's Magnolia-licious online store...just click on the button on my sidebar and you can shop 24/7...how convenient is that? My card is simple so there's not much information to share but here is my new found love for Mini Tilda:
My card base is the usual 5.5" x 5.5" and I used a shimmery pink cardstock called Stardream. Lots of nice sparkle. The DP from the beautiful BoBunny "Jazmyne" line and it sparkles so much but I was not able to capture it. The corners are punched with MS Double Loop corner punch. I only punched the corners, then used the border Double Loop punch for the band in the center.
I die cut a butterfly base from the Stardream CS with my Stampin' Up! Beautiful Buterflies-Bigz die. I love this die as it has several different sizes of butterflies.
I then die-cut two more butterflies from light weight vellum and I edged all three butterflies with Stickles Frost White but you can't tell from my lousy pic! I placed a tiny piece of foam tape under each wing to "separate" the layers for dimension. I used flower stamens for her antennae.
Here's a side view so you can see how the wings are separated. I colored Mini Tilda with Copics:
Hair: E33, YR24, Y21; Body: E50, E00, R00; Dress: R85, 83, 81; Wings: BG10 and went over the wings with Stardust Stickles. Tilda is mounted on double foam tape.
Those beautiful roses are from my dear friend Suzan! She's my "paper florist" because she keeps me supplied!
Thank so much, Suzan!
That's all for my card! Thank you for taking the time to stop by and I hope you're all enjoying your weekend and hopefully getting in some crafting time!
My "baby" hasn't been feeling too well lately and a visit to the vet's determined she' having some problems with her kidney and I just made me feel distressed because she was so lethargic and didn't eat for a couple of days, but she's feeling better now with all the love and attention she's getting. I though I'd share a picture of my "Peaches." She's a Bichon-Frise and the love of my life (after Hubby).
Peaches is a very affectionate "lap dog" and loves to be close to people. Daddy is sleeping after having some wine but they both keep me company in my craft room LOL!
Sorry for the long post . . . enjoy your weekend!
Saturday, April 24, 2010
Thursday, April 22, 2010
OCS (One Card Share) Card
Hi there all you crafty people! Tomorrow is Friday and I can't wait for the weekend! I have a very special card I'd like to share with you today and it's from a very lovely and talented gal, Jodi-Ann of Inked Inspirations. I was fortunate to be partnered for the March OCS (one card share) that was the brain child of Teri of Big Ideas from a Little Girl. Teri has passed the torch on to a hilarious duo, none other than Linda of Simple and Sassy Creations, and Kyoko of Cards and tags Mania. Teri has done an outstanding job of coordinating and assigning partners for over a year and a half, so thank you, Teri, for all your hard work. If you would like to join this fun monthly swap, go here and let Linda know! So now for the beautiful card I received from Jodi-Ann:
Can you imagine my surprise and how ecstatic I was to find this beautiful card? OMGosh, that Jodi-Ann never stops impressing me with her coloring abilities. Every image comes alive with her choice of colors and her skill. I love butterflies and perhaps by coincidence, Jodi chose this image, and in two of my favorite colors, pink and lavender! I love this card Jodi! Thank you ever so much.
Not only did I receive this beautiful card, Jodi-Ann added so many goodies in the package! I want to share them because this is the kind of gal Jodi is. Always sharing and thinking of the next person. It is not a requirement as part of the OCS, in fact, just a card to swap with your assigned partner. But I know I am blessed to have developed a friendship with Jodi and we can craft together sometimes.
Here is what she sent to me:
I will be back tomorrow to share some wonderful RAKs from some very talented Island Gals! That's the wonderful advantage we have of living on a small island because it's never hard to go from one end of the island to the other to meet with friends. That's what we call the "Aloha Spirit!" Have a wonderful evening/day!
Tuesday, April 20, 2010
Tilda with Wrapped Presents and a Lovely RAK
Hope your week got off with a good start! It's almost mid-week and I can't believe how fast time is flying by. I made a birthday card for a blog friend and believe it's safe to post it now.
I believe this image is called Wrapped Presents but I just can't remember from which collection. You can get your Magnolia stamps from Diana over at the Magnolia-licious online store by clicking on the store button on my side bar.
A few deets on my card:
The card base is 5.5" square and I used Bazzill CS. The DP is from Basic Grey-Kioshi. This has to be one of my most favorite stack from BG! Every DP is beautiful! I know this card is simple and plain, but I din't want to take away from the beauty of the DP and cover it up with laces and trims and flowers. LOL!
I colored Tilda and her presents with Copics:
Dress and Presents: R81, 82, 83; V17, 15, 12;
Hair: E99, 19, and Y23
The sentiment is from SU! "Well Scripted" and on the inside (not shown) I used "Whimsical Words." Other: MS Double Loop corner and border punches; distressed the edged. Marvy scallop rectangle punch for the sentiment. I adhered the image on foam tape and also distressed the edges. The cupcake is a button from Jesse James and I snipped off the shank on the back and mounted it on foam tape. That's it!
Now on to the lovely RAK I received from Kim Yu of Kimbee's Creations! I was ecstatic when I opened the package and found this gorgeous card and the beautiful handmade bracelet from Kim! I wish you all could see it in real life as it is so beautiful and Kim put so much love into it. THANK YOU, KIM! I love both the card and the bracelet! Go check out Kim's site and see all her wonderful creations including her jewelry items! You will be totally inspired by her creations!
I believe this image is called Wrapped Presents but I just can't remember from which collection. You can get your Magnolia stamps from Diana over at the Magnolia-licious online store by clicking on the store button on my side bar.
A few deets on my card:
The card base is 5.5" square and I used Bazzill CS. The DP is from Basic Grey-Kioshi. This has to be one of my most favorite stack from BG! Every DP is beautiful! I know this card is simple and plain, but I din't want to take away from the beauty of the DP and cover it up with laces and trims and flowers. LOL!
I colored Tilda and her presents with Copics:
Dress and Presents: R81, 82, 83; V17, 15, 12;
Hair: E99, 19, and Y23
The sentiment is from SU! "Well Scripted" and on the inside (not shown) I used "Whimsical Words." Other: MS Double Loop corner and border punches; distressed the edged. Marvy scallop rectangle punch for the sentiment. I adhered the image on foam tape and also distressed the edges. The cupcake is a button from Jesse James and I snipped off the shank on the back and mounted it on foam tape. That's it!
Thank you for stopping by, and I wish you all a blessed day, every day, and happy crafting! I know I am very blessed by all of you out there.
Monday, April 12, 2010
Valentine Tilda and Chasin (Butterflies) Tilda
Happy Monday, Everyone! Hope you all had a wonderful weekend and the new week is taking off to a great start! I have two beautiful cards to share with you today, created by my GF Suzan. She so generously sends me "craft supplies" that will outlast me! And with every box, she includes a handmade card that I treasure. Suzan does beautiful work and had one of her cards published in the Magnolia-licious ads in a couple of magazines. It's a card featuring Edwin with his boat and dog. You can find all her wonderful creations here. Now on to her fab cards:
Aren't these cards just lovely? Suzan always puts so much details into her cards and her love for crafting definitely shows. Thank you so much, Suzan! Your cards have a special home in my craft room so I can constantly be inspired by you. Please visit Suzan's album in the Magnolial-licious Yahoo Group and send her some big hugs. You will be very impressed with her creations, as I am.
Thank you for stopping by today. I just had to share these cards and know you will be inspired and impressed with them. Have a wonderful week and happy crafting.
Sunday, March 28, 2010
Little Bunny Tilda and Tilda with Tulips Tent Card
Well, I hope you all had a wonderful weekend and are ready for a new week. This will be a short post because I can't type much as I'm having problems with my right hand so I also apologize if I'm not visiting and leaving comments on your blogs. Things should be getting better, soon I hope. Anyway, the card I made below is for my OCS (one card share) partner, Jodi. You all know Jodi of Inked Inspirations. I was so happy that Teri, who hosts the monthly OCS, paired me with Jodi. Well, I was very nervous at first because Jodi is so talented and known worldwide with all her DT work! But I was happy because I get to have one of her personally created cards! I know she received it already so it's okay to post it.
I got these stamps from Diana of Magnolia-licious and you can find alot of the Magnolia stamps here. If you can't find what you want, email Diana and let her know what you're looking for. Many times, the stamps fly out the door as soon as she posts them to the store but Diana would be happy to reorder them for you. Diana ships orders out very promptly so I had to ink them up as soon as I got them, and lucky thing!
Thank you so much for stopping by and leaving me your encouraging comments. I wish you all a wonderful week and a Happy Easter if I don't get to post again before then.
Friday, March 26, 2010
Mini Easter Baskets
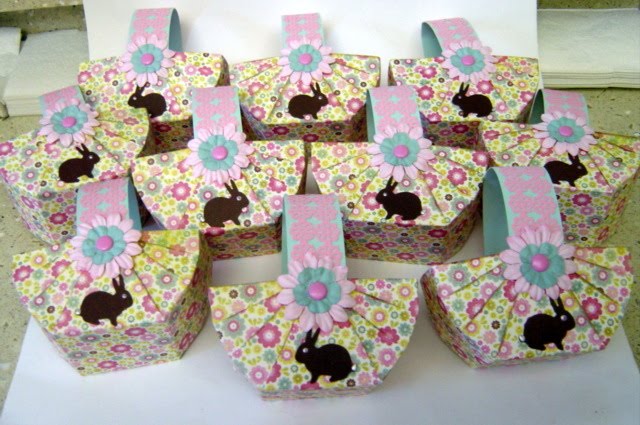
Happy (Aloha!) Friday, Everyone! Aren't you glad the weekend is here? I want to share some cute little Easter baskets I made to put some Easter treats in for some gals I'll be seeing at a craft get-together. I think it's safe since they'll soon get it. They are empty now because I didn't want to fill them too early and have the chocolate melt. Anyway, here they are:
This is looking straight on. I used (again) DP from MME Quite Contrary-Little Miss Muffet "Hello Beautiful" Little Flowers Paper. After cutting the pieces on the basket, I distressed each strip with TH's Frayed Burlap to give it a little dimension before adhering them to form the basket.
I punched out those brown bunnies with MS bunny punch in two directions and put one each on either side of the basket.
I also used a MS Floral Band punch and punched both sides of the strip on the handle.
The next pic shows looking down at the basket. As you can see, the DP is double sided to it looks nice on the inside also.
For the little punched out bunnies, I used some Pastel Rasberry Liquid Pearls for the eyes (just a dot) and also White Opal Liquid Pears for the bunny's tail.
It will definitely look better once the baskets are filled with little goodies and some Easter grass!
Lastly, here's a "group" picture of the little baskets. I hope the gals like it as much as I had fun making them.
These would be cute of any occasion just by changing the theme.
Okay, I know there are some of you who want to make these cuties, and you can find the details below.
I found the instructions for these cuties here and thank Dawn for her wonderful instructions. I always enjoy seeing what she will come up with next. Thank you, Dawn!
And thank you all for stopping by today. I wish you all a wonderful weekend and happy crafting.
Tuesday, March 16, 2010
Unwrapped Tilda Thank You Card
Happy Tuesday going on Wednesday, Everyone! Hope your week is coming along fine. I'm so behind in my social obligations (thank-you's etc.) and it's just a vicious cycle for me right now. I try to tackle one thing and something else comes up. C'est La Vie! Enough ramblings and on to my card.
I won Joy's birthday blog candy last month and have been working on this card on and off as time permitted. Joy, A Place To Be Me, loves the color purple and for some reason, DPs in purple is the hardest to find! Go figure! So this is what I ended up with:
My card base is 5.5" square and I used Bazzill in a deep purple. There was no ID on the DP so I don't know who makes it. I used Unwrapped Tilda from the Winter collection and I find that this image can be used for so many occasions where a gift is concerned. It reminded me of when I received a box full of wonderful goodies! You can purchase alot of the Magnolia stamps here. If you don't see what you want, it may be out of stock so just email Diana and let her know what you are looking for. The sentiment is computer generated and I punched it out with my SU! word window punch and distressed the edges with Memento Lulu Lavender. The butterfly is punched three times: the base in Bazzill, the DP, and SU! vellum CS then embossed with my Cuttlebug Love Language embossing folder. Here's the recipe for the rest of the card without boring you with all the details.
Recipe:
Copics: Dress and socks: BV04 02 01 00; Box: E71 70; Hair: E25 99 YR24; Shadow: C2
Punches: Punch Bunch fern and leaf; SU! Butterfly and Word Window
Other: Cuttlebug antique corners; Love Language embossing folder
Thank you for stopping by today and until the next time...happy crafting!
Sunday, March 7, 2010
Sweet Tilda Tent Card
Happy Sunday going on Monday, Everyone! Hope you all enjoyed your weekend and are ready for a full week ahead! I had a chance to make a Tent Card for the Just Magnolia Special Monthly Challenge for week 45. The tutorial is done by the lovely Dena and you can read all the details here.
We didn't have much sunshine today where I live. It's been rather gloomy with showers off and on all day, for the last 4-5 days. Excuses! (sigh!) But this was the best pic I could get this afternoon so I apologize.
Although Dena's instructions were for a 6"x6" square card, I made mine 5.5" x 5.5" square so I can put it in my envelope I have on hand.
Recipe:
Stamp: Magnolia Sweet Tilda
CS: Bazzill, PTI Select White (for image)
DP: The Girls' Paperie
Ink: Memento Tuxedo Black
Copics: Dress: Y08 Y11 RV11 RV10; Hair: E29 E25 E34; Shoes: E37 E34
Other: Sizzix Sizlits Heart Lace border die
Nesties Curved Rectangles
Here is a side view of my tent card:
You can get all your Magnolia stamps here. If you don't see it, it may be out of stock but you can send Diana an email and ask her to order it for you. In the meantime, I'm sure you'll find many other images you'd want to get!
Thank you very much for stopping by and I wish you all a very pleasant week.
Saturday, March 6, 2010
Sweet Tilda Goodie Box
Happy Saturday Everyone! I'm sure you are all enjoying the start of your weekend. Here is another heart fold card I made, but this time, I attached to a little box I made to fit the size of the card. Actually I was going to make a bag and put handles on, but because I am planning to mail this, the handle would be crushed or mangled so I opted to leave it as a box. It's very simple, but here it is:
I decided to (finally) use my Nesties "Blossom Two" die that Sweet Tilda is popped on with foam tape. I stamped Sweet Tilda with Memento black tuxedo on PTI cardstock, and colored her with Copics. I punched some small flowers with my retro flower punch and layered that between the prima flowers to bring back the background DP.
Recipe:
CS: Bazzill, PTI aqua mist
DP: MME Little Miss Muffet "Hello Beautiful" Little Flowers Paper (phew! but that's the name!)
Copics: Dress & Socks: BG72 B52 BG10 R81 R83 R85; Shoes: E99 E35; Hair: E99 E35 Y08;
Others: Nesties Blossom Two; SU border punch, EK Success small retro flower punch, Prima flowers, Punch Bunch leaves punch
Thank you for stopping by today, and enjoy your weekend.
Saturday, February 27, 2010
60's Tilda
Happy Saturday, Everyone! Well, I guess most of you heard about the Tsunami Alert the state of Hawaii was on from early this morning due to the devasting earthquake in Chile. Coastal areas were closed and people sent to higher grounds, shopping malls closed, no postal delivery except for areas not considered critical, etc., etc., and lots to watch on TV as the anticipated time of 11:04AM got closer. We're all so happy this is rather behind us now but the state did continue to take precautions about having people enter the waters for a while.
Okay, now for my card today. February was a month with lots of birthdays and goings on for such a short month. I am so behind in my projects and still scrambling! I made another BD card for another gal who loves anything purple. I decided to use 60's Tilda from the A Little Yummy for Your Tummy Collection.
I apologize for the poor quality of the picture. My camera battery was just dieing on me. The sentiment in the "Elegant Heart" from the Raising the Ceiling Collection says: "Happy Birthday" "Sweet Birthday Treat" and I can't remember who makes this stamp.
I (again) used my Sizzix Heart Card Bigz XL die for the card base. The heart lifts up. My card base and the heart portion is from Bazzill, and the inside DP is from DCWV Pocket Full of Posies.
Tilda is colored with Copics: Body: E50 E00 R00;
Hair: E29 E25 E34; Dress: V01 V15 V17
I also used Sizzix Corner Flourish #2 die and cut it half to arrange it around the bottom of the heart.
Ribbon and flowers from my stash.
I'm trying to finish another project before February comes to an end (tomorrow!).
Thank you for stopping by to visit with this cute 60's Tilda! I hope you all have a fun-filled weekend and I'll be visiting blogs again shortly to see all your wonderful creations. Until next time, stay safe, keep healthy, and enjoy life every day.
Tuesday, February 23, 2010
Sweet Tilda Miss You!
I had a chance to work on a card over the weekend and decided to enter Sweet Tilda in two challenges: Just Magnolia Challenge #43 with a lovely sketch by Jay Jay, and Magnolia Down Under - Easel card, Everybody Art Challenge - Easel Card. I'm so close to the deadline for MDU so I took a pic tonight and the lighting is not the best so it looks dreary - my apologies. After I finished, I thought I put too many things on my card, but I still wanted to conform to the sketch. Oh well, it's finished so I'll have to remember "less is more" on my next card LOL.
Recipe:
Stamp: Magnolia - Sweet Tilda from the Raising the Ceiling Collection
CS: Bazzill
DP: Basic Grey - Lemonade
Copics: Clothing: Y08, Y11, RV11, RV10; Hair: E29, E25, E34; Shoes: E37, E34
Punches: MS Double Loop Border and Grass punches; Marvy (blue) heart punch
Misc: Cuttlebug Love Language mini heart embossing folder and die (Miss You); yellow flowers are Michael's wedding flowers, and mini roses are from my stash. Cut green petal with pink Swarovski crystal) is also from Michael's.
The sentiment on the inside is from Stampin' Up!
Thank you for stopping by to visit with Sweet Tilda. Tomorrow is mid-week and we're getting closer to the weekend. Hubby returns from a business trip to Japan tomorrow so the house won't feel so "empty." I wish you all a fun-filled week and weekend.
Friday, February 12, 2010
Noble Tilda Valentine
Happy Aloha Friday Everyone! I don't know where Thursday went. I'm sorry if I'm boring you with all these heart fold cards but I had so many ideas in mind and need to get them out! I'll be quick today. Here's "Noble Tilda" from the new Raising the Ceiling Collection that is on pre-order from Magnolia-licious. But, to be honest (shhhhh!) I still have a hard time doing Tildas with heels or pumps on. She looks cuter with her boots or Mary Janes LOL! My personal opinion so don't hit me LOL! Okay, here's my card:
I am trying to get better at coloring with black, or the darkest gray shade I have. That's why I went with this red/black/white theme. Unfortunately, my coloring skills aren't getting any better. OMG I colored her hair black originally and it was a total DISASTER! I tell you, she looked older than her age by 100 years! I had to recolor her head and I cut it out and adhered it over the booboo head!
I added crystal lacquer to the tiny rose on her dress and on her shoes also. The rest is self explanatory so I won't go into details here.
Have a wonderful weekend to all of you, and thank you for stopping by.
Subscribe to:
Posts (Atom)